
Chess Set
A CHIP OFF THE OLD SOVIET BLOC
Chips and busted bases – chippititus! Sorrowfully, an all-too-common ailment throughout the chess collecting community and the subject of this month’s (somewhat delayed) Chessay. Whether a set is made from wood, bone or carbolite, an unexpected tumble from the playing table or an over-enthusiastic ker-thud! during a game of blitz and <<< BOOM!! >>> Shift happens, you have a patient on your hands. The cure? Well, if the set is made of wood like these Soviet pieces (c.1935) it isn’t actually too complicated, so with July’s Chessay I’d like to share with you two homemade ‘elixirs’ to sooth these unsightly battle scars.
Accepted, you’re going to need a few specialist tools for this project, the ‘main player’ being a Dremel or any similar gadget that can handle a small 0.5mm drill bit – and if you collect vintage chess sets, come on, one of these should already be in your armoury. Another essential is a tub of ‘high performance’ wood filler, most preferably one that you mix with a hardening agent and can be carved and stained (check out the Minwax range if available in your area) and lastly a little bottle/tube of super-glue – whatever brand floats your boat – and with that we are ready to set sail.
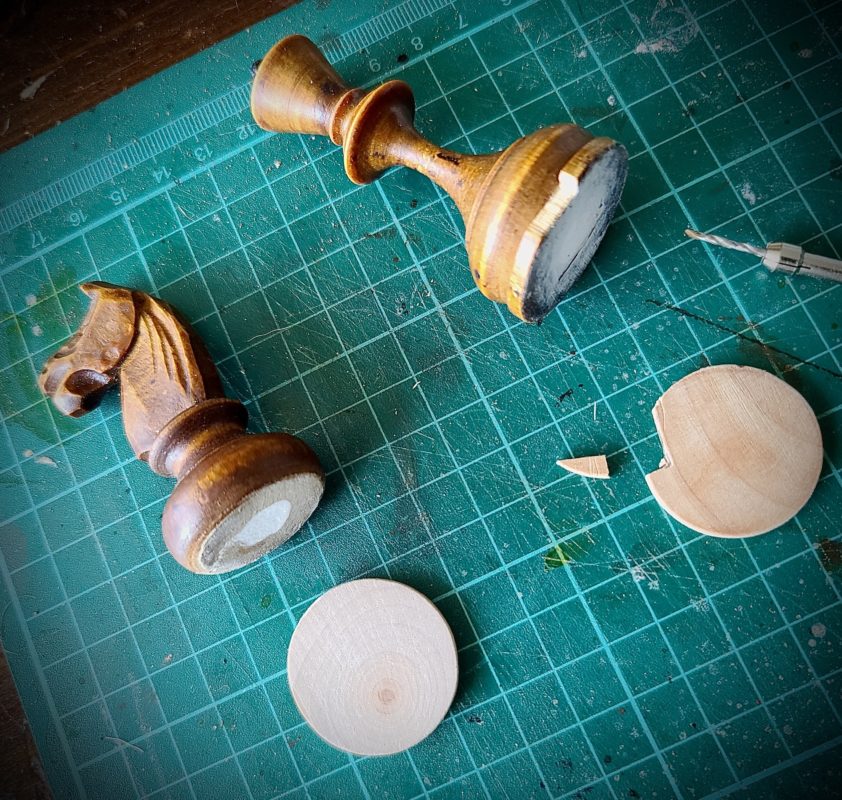
Righty-o-then, let’s examine PIC 1 (above) as we have two different medical conditions here. The original rim of the knight’s base was chipped absolutely everywhere, absolutely untreatable, absolutely beyond help. In fact, it was an amputation job! – far easier to replace than repair. Queenie, on the other hand, has a relatively mild dose of chippititus. If this happened a half century ago and had accumulated some of that wonderful ‘finger-slime’ over the years (see May’s Chessay) I may have lived with it, but this looks almost fresh and a fresh wound is hard on the eyeballs, so it’s definitely heading to intensive care. The small piece that chipped off, by the way, is lost to history, so as you can see I’ve cut a disc to the same size as the base, outlined the repair in pencil and cut out the replacement piece with the Dremel. The new piece doesn’t have to be absolutely exact, just as close as you can get it as we are going to strengthen the repair with a support and the aforementioned wood/epoxy filler anyhow.
The following procedure, I do admit, is a tad fiddly, but well worth it. I like to insert a small support peg (0.5mm) into the base for added strength. It looks daunting but virtually ensures it won’t chip off again. Mark your entry point onto the base of the chess piece FIRST to guide in the drill bit (use a small sharp blade like a scalpel for this). Once you have your guide hole marked slip the Dremel onto its lowest rotation (setting 5 or 5000 r.p.m.) and holding the Dremel like you would a pen gently letting your 0.5mm drill bit slowly bore a hole about 3mm deep into the base. Once complete you now need to find/make a wee plug to fit the hole. A toothpick will generally suffice, or if you have a wool shop near you it’s possible to buy 0.5mm wooden knitting needles (super-handy!) that can be chopped down to whatever size you need (see PIC 2, below left). Once the peg is super-glued into position (PIC 3, below right) place the newly cut repair underneath the peg and mark your opposing insertion point with a pencil, this way the two points of entry should line up exactly.


The wee peg (painted red in pic 3) doesn’t have to protrude too much, 2 or 3mm, just enough to grip and add stability. Now place the ‘chip’ into a set of pliers or a mini-clamp and using the Dremel in the same manner drill a 0.5mm hole into this tiny piece – and take your time, chill, if you balls it up it’s easy to mark out another one and go again. Once you are satisfied with the fit use the super-glue to bind the repair to the peg in the base and slip the fix into a mini clamp to chill for an hour or so (PIC 4, below).
While Queenie is putting her feet up let’s now super-glue the knight’s new base into place (I removed the old, gnarled one with an orbital sander). Once you have carefully glued the base into place, mark out a few random points on the bottom of the piece (PIC 5, 6 & 7 below) as we want to drill in some angled pegs for additional strength.


I generally drill three small holes (using a 1mm drill bit at an angle as shown) super-glue and insert the plugs then sand off the superfluousness, and I guarantee, the new base will stay in place for at least another 100 years! By the way, these super-handy wooden discs can either be custom-cut from salvaged/reclaimed wood (spindles are ideal) or purchased online in various woods and sizes (just Google ‘wooden discs’).


As you can see, the reclaimed spindles of old, damaged chairs are worth their weight in gold (PIC 8 & 9, above) as they can be custom-cut to match any sized base – my lovely wife, Angie, tells me, “don’t you be bringing home any more old chairs!” I say, “Honey, spindles are a man’s best friend.” Incidentally, I cut the base a little too thick here, a problem easily solved by a quick spin on the lathe (PIC 10 & 11, below) or a belt sander if you have one handy. When finished I still wasn’t completely happy as it looked a tad ‘too new’ so I gently sanded down the edges and made a few ‘nicks’ here and there around the base in keeping with the original vintage pieces. These subtle finishing touches can make all the difference…


Back to Queenie then! The repair is now firmly in place but I want to add a smattering of the epoxy/wood filler over the whole repair just to bond everything securely together. Tape off the upper bulb of the base using green painter’s tape (not super sticky, so won’t harm the patina), mix a small amount of filler/hardener and apply a generous amount over the wound (PIC 12, below left). Carefully pull the tape immediately after applying the filler, then once it sets up this can now be re-taped (always protect the finish above) and sanded flush – don’t worry too much about sanding into the original finish either side of the repair as we are going to blend in a wood stain over the whole area anyhow.


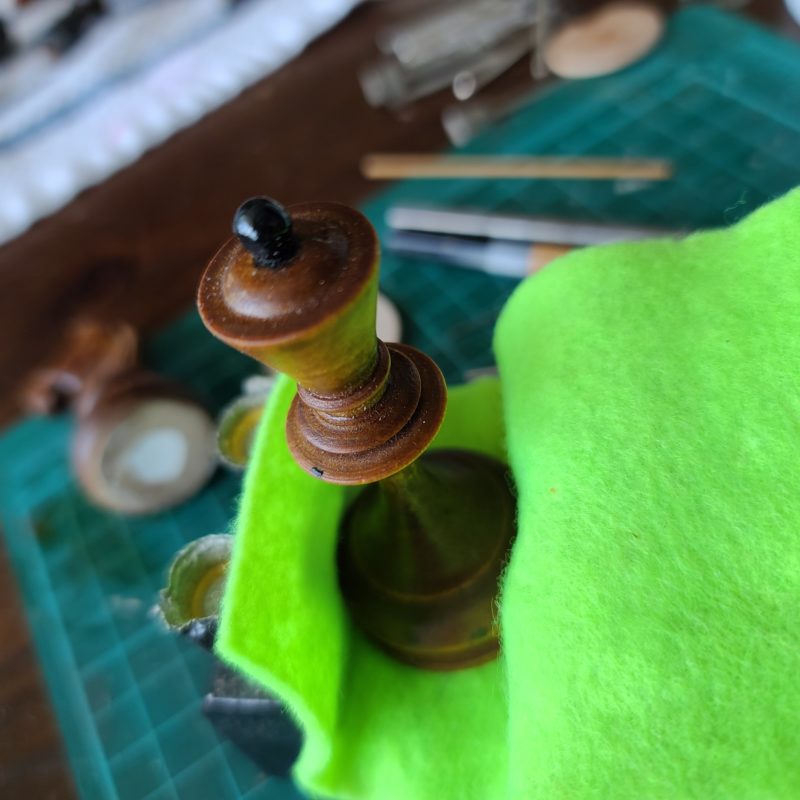
Now we have reached the final stages with the two pieces (PIC 13). Queenie has been sanded back using 220 then 400 grit sandpaper and the knight’s base has been distressed ever so slightly and had a very gentle sand. The endgame is afoot, so tape up once again and the project is ready for stain. Usually I would custom-match a stain, but here I must admit I got quite lucky as the colour was a familiar one, Minwax Mission Oak, perfectamundo! Two thin coats (PIC 14 & 15, below) and my mission here, as they say, is complete!


Until next time – check you later!
Copyright Alan Power, The Chess Schach, July 2020. All rights reserved.