
Chess Set
DID YOU FEEL IT OVER THE HOLIDAYS? I FELT IT!
As collectors, we all have vintage chess sets that would be absolutely perfect if only they had just a little more weight or the original felt bases were … well, a little less on the ‘vintage’ side. Understandably, adding weight, or more specifically, boring a hole into the base of a chess piece can be a daunting task to some, especially if the set has value, either sentimental or monetarily (and we’ll be addressing the subject of ‘weighting’ in more detail in the future). In this month’s Chess Schach CHESSAY, however (being of a certain age I am somewhat uncomfortable with the word ‘blog’), we will be tackling the latter of these two so-called evils, that being, the relatively simple task of replacing or adding felt to one’s cherished chess set.
First step; choose your weapons! SHARP SCISSORS, a SCALPEL/surgical blade, metal RULE and a PENCIL will speed things along considerably. Personally, I use my wifey’s small nail scissors to edge the felt – with permission, of course – which are slightly curved and hug the rounded base of the pieces more efficiently than normal scissors. Secondly, make yourself comfortable and choose a good cutting station. A large kitchen chopping board is perfectly adequate, but preferably an artist’s CUTTING MAT (self-healing, non-slip) is ideal, and if you’re handy, serves a thousand other uses – but if you’re felting just use the cutting board!

That done, the next consideration is which type of FABRIC ADHESIVE should we use? Try to find a water-based UNIVERSAL GLUE that dries “crystal clear,” as certain brands of wood glue can penetrate the felt and leave white or yellowish stains on lighter colours (including green) – and PLEASE don’t even think about super-glue! Personally, I use a Canadian brand called “Steel Tough Weldbond” as opposed to ‘normal’ white glue (see Pic 2), simply because I love the name! Well, that’s not completely true. It just works bloody marvelously. Give it a google and find something close to that and you’ll do fine. Lastly, pick up a cheap ARTIST’S BRUSH and a SMALL SPONGE of some description, not essential, not expensive, but will help keep things chugging along nicely. Lastly, and most importantly, we need a belt of COLOURED FELT. Which particular colour, texture and depth (you can also opt for faux/real leather or baize) depends greatly on taste and the design of the chess set in question. I prefer a medium depth felt because of the availability and infinite range of colours to choose from but will obviously purchase according to which set I am working with. In my experience, the amiable vendor (if poked) should provide answers to all your enquiries – and for a small purchase in particular ask about any off-cuts or ‘odds and ends’ – these will literally cost you pennies.
So, we are all good to go! And to get the ball rolling we need an absolutely SMOOTH AND LEVEL BASE – don’t make me say that again. If you have a rotary sander, perfect, peel off the old covering (be it felt, fabric or leather) gently touch the base against the wheel using 100 or 150 grit sandpaper and it’s done (Pic 3). If not, tape a sheet of 100/150 grit sandpaper onto your worktable and jig a few ‘figure eights’ (sanding in the shape of an ‘8’) with the piece until you are satisfied that it is absolutely level. From now on in everything is relatively easy breezy. You have all the right tools, you’re sitting comfy, and you’ve chosen the perfect material for the set. What could possibly go wrong? Well, a few things actually, but I’m here to lend a hand with that.
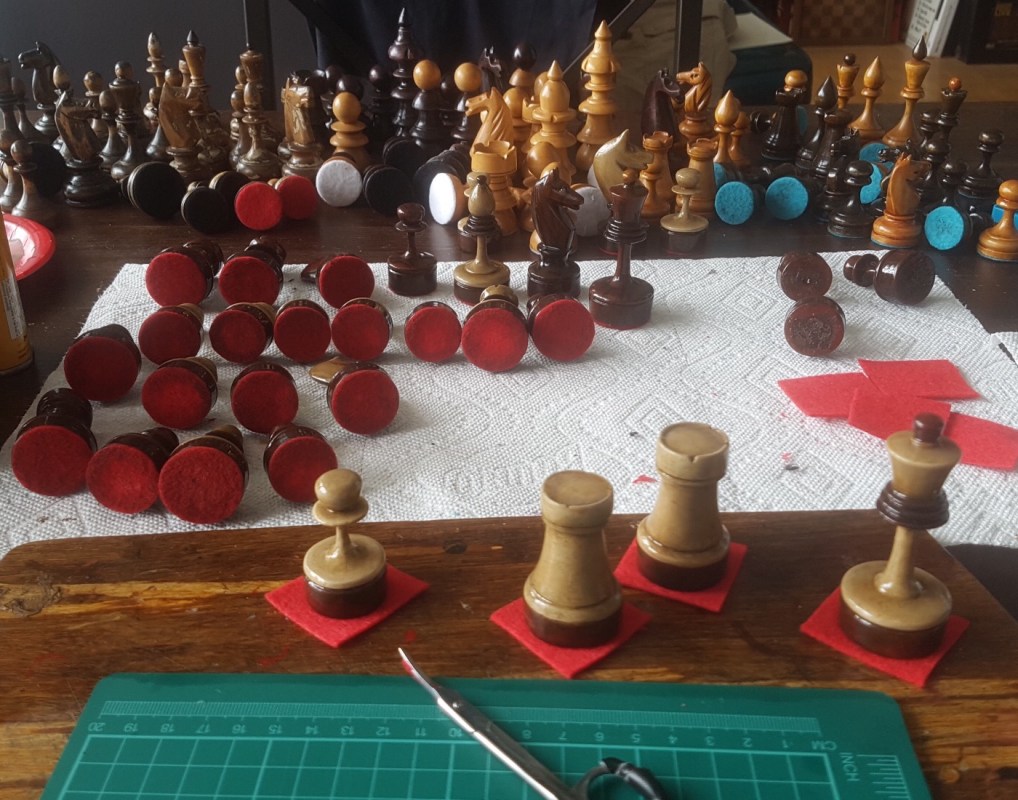
To be straight up, there are many different ways to felt a chess piece and I’ve used quite a few. This is just what I’ve settled on and I’m an old British bulldog who’s seen a few tricks. So here we go; I start with the pawns – let’s get the riff-raff out the way first! Line them up (they should all hopefully have the same size bases) on the felt and mark a square with the pencil around them, a similar size to the image below (Pic 4).

Splice the felt using the rule on your cutting board and place underneath each pawn, making sure there is enough overlap. And here’s a pointer. Look carefully at the felt. One side will be slightly smoother than the other. You are looking for the ‘nap’ – the natural roll of the material – so use this side for the outer base and fasten the rougher side to the bottom of the piece. Thank me later. Next, wet the small sponge you stole from under the kitchen sink and have it handy to one side (we need this to wipe off any excess glue – see Pic 5), then apply a small amount of adhesive to the base of the piece (Pic 6).

Use the small artist’s brush to feather this out towards the edges (Pic 7) and wipe any excess off onto the damp sponge at hand. Gently lower the piece onto the felt and rotate in a circular motion pushing down firmly for a few seconds until it has purchased, then tip at an angle to secure all the edges, again rubbing it on the board in a circular motion. Now set on their sides to ‘air’ (as opposed to standing upright) with the felt tucked under the base of the piece, as in Pic 8. Repeat this procedure with the major pieces making adjustments for the size of the bases, which will obviously be larger.

(anyone else suddenly crave grilled cheese?)
Leave each piece to set up/dry for 30 or so minutes. They will not be completely secured to the base so if any mistakes occur during the next stage you can whip the felt off and go again – shift happens! don’t sweat – ‘scissor technique’ isn’t a born skill, believe me. Again, there are various approaches to felting a chess piece. Some prefer a tight edge, as do I (saucy!), while others leave a millimetre or two between the felt and the outer rim (hmm…). I like to see a little colour beneath the pieces, others like the ‘hovering’ look, no problem, each to their own.
Now the tricky business where you have to be mindful. When edging the felt, and here’s another important pointer, tilt the scissors 45 degrees leaning away from the base so as the upper blade doesn’t scratch down and scuff the finish on the rim – learn from my mistakes! Whether your set is old or new, keep your concentration during this part of the proceedings. I find stabilizing the ‘cutting hand’ while rotating the piece towards the scissors is the most effective technique, using a continuous even motion. Another pointer; practice with your wifey’s scissors! If attempting this for the first time practice on larger or smaller objects, preferably both, as did I, just to get the feel of things. It’s totally worth it and the pleasure you’ll have over the years playing with a set you’ve infused with your own handy-work will not only give you and your opponents pleasure but may well give pleasure to generations to come. Who knows? I’m felting it!
Check you later!

Alan Power TheChessSchach, December, 2019
I should have read this before I used superglue.